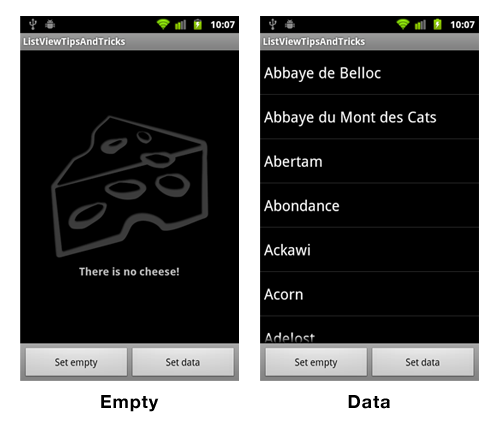
Note: This is the first article of a series I have entitled “ListView Tips & Tricks”. When developing on Android, you often need to display a large set of data (contacts, audio tracks, etc.). Most of the time, the data items are very similar and need to be displayed identically via a ListView widget. ListViews are widely used “as is” in Android UIs. However, your ListView-based applications can be customized, optimized and/or polished by utilizing simple tips and tricks. This series of blog post will introduce you to several techniques you may use to boost and/or improve your applications.
Note: I usually write articles for this blog in French. The main reason is I think Android lacks of French documentation. Nevertheless, I have also noticed there are just a few websites dealing with advanced UI development techniques. I think tips and tricks given in this series may be very useful to many developers all around the world. In order to enlarge my audience, I’ve decided to write these posts using the most common language in the field of technology: English
Introduction
When displaying a set of data in your applications, it is recommended to handle the following cases:
- The common case: occurs when the underlying data set is made up of one or more items.
- The empty case: this is actually the opposite of the previous case. The empty case happens as soon as the underlying data set is empty
Having a different UI for each of those two cases is very important from a user point of view. Indeed, it helps her/him to easily differentiate between the two “data” states. Do not forget about it when developing your applications.
Empty view
The ListView class or more generally the AdapterView class (Gallery, GridView, etc.) handle the empty case in a very simple way. AdapterView exposes a method called setEmptyView(View) that binds a View to itself. Once an empty view has been set, the AdapterView hides/displays it according to the current state (empty or not) of the underlying Adapter.

The AdapterView and the empty view are mutually exclusive in term of visibility: if the empty view is visible (View.VISIBLE) the AdapterView has the View.GONEvisibility and vice-versa.AdapterView` determines its emptiness by looking at the following conditions:
- The underlying
Adapteris null - A call to
isEmpty()on the underlyingAdapterreturns true
ListActivity
The Android framework also provides a very handy way to deal with ListViews in your UIs. Android provides a dedicated Activity: ListActivity. When setting a new layout using one of the setContentView methods, the ListActivity automatically looks for a ListView with the identifier android.R.id.list and starts managing it. It also looks for a View with the identifier android.R.id.empty. In case such a View is available in the layout it is directly set as the empty view to the previous ListView. As a result, handling the empty case in a ListActivity is as simple as adding a View with an android:id XML attribute set to @android:id/empty in your layout
Sample
In order to show you how to set up your code to deal with the empty case, I have developed a tiny and simple application. This application does nothing more but displaying a UI with a ListView and two Buttons. Those buttons help you to empty/fill the ListView with data. You can find the whole code of this application in the following archive:
As we have seen previously, we are about to make our code as clear and simple as possible by using a ListActivity. The only thing we need to do is to create a base layout containing a View with the @android:id/empty identifier. The ListActivity will automatically handle everything! The layout below is made of three parts:
- A
ListViewidentified by@android:id/list - An empty view identified by
@android:id/empty. - Some controls at the bottom of the screen
1 2 3 4 5 6 7 8 9 10 11 12 13 14 15 16 17 18 19 20 21 22 23 24 25 26 27 28 29 30 31 32 33 34 35 36 37 38 39 40 41 42 43 44 45 46 | |
Note: Some of you may have noticed, I have used a ViewStub as the empty view. The ViewStub lets you inflate a view hierarchy only when needed (it’s kind of a just in time inflation). In our previous example, the layout @layout/empty will be inflated only when the ViewStub visibility will change to View.VISIBLE. Once the @layout/empty view hierarchy is inflated, it replaces the ViewStub in the global layout. If you are not familiar with this class, I suggest you to have a look at the ViewStub documentation
We can now use the layout in a simple ListActivity:
1 2 3 4 5 6 7 8 9 10 11 12 13 14 15 16 17 18 19 20 21 22 23 24 25 26 27 28 29 30 31 32 33 34 35 36 37 38 39 40 41 42 43 44 45 46 47 48 49 50 51 52 53 54 55 56 57 58 59 60 61 62 63 64 65 66 67 68 69 70 71 72 73 74 75 76 77 78 | |
That’s all! Simple isn’t it? Handling the emptiness of a ListView can be done in a very simple way. When developing your Android applications, do not hesitate to add empty views. Using a fancy Drawable in addition to an explanation text is usually better than just displaying nothing … Let your imagination do the rest!