Every day, hundreds of millions of people make videos, take photos, send messages, etc. The amount of data resulting from the everyday Internet activity is amazing and mostly created by individual users. Fortunately, a lot of applications are providing searching or filtering capabilities to help users quickly browse and find content. Whenever an app creates or provides content, it comes with a search feature: Gmail, Google Calendar, Play Store, etc.
Although search is usually one of the main entry point in a mobile app, I regret to see a lot of mobile apps are not always implementing search in a comprehensive way. Specifically, I often end up having search results presented to me but don’t always understand why. In this article, I will introduce you to search results highlights, explain you why they are extremely helpful from a user point of view and how simple it is to implement them in an Android app.
Introduction
Let’s first look at the two screenshots from two common apps: Todoist (a very handy and well-designed to-do list app I use on a daily basis) on the left and the built-in Contacts app on the right. In both cases, screenshots are taken while the application is showing search results.
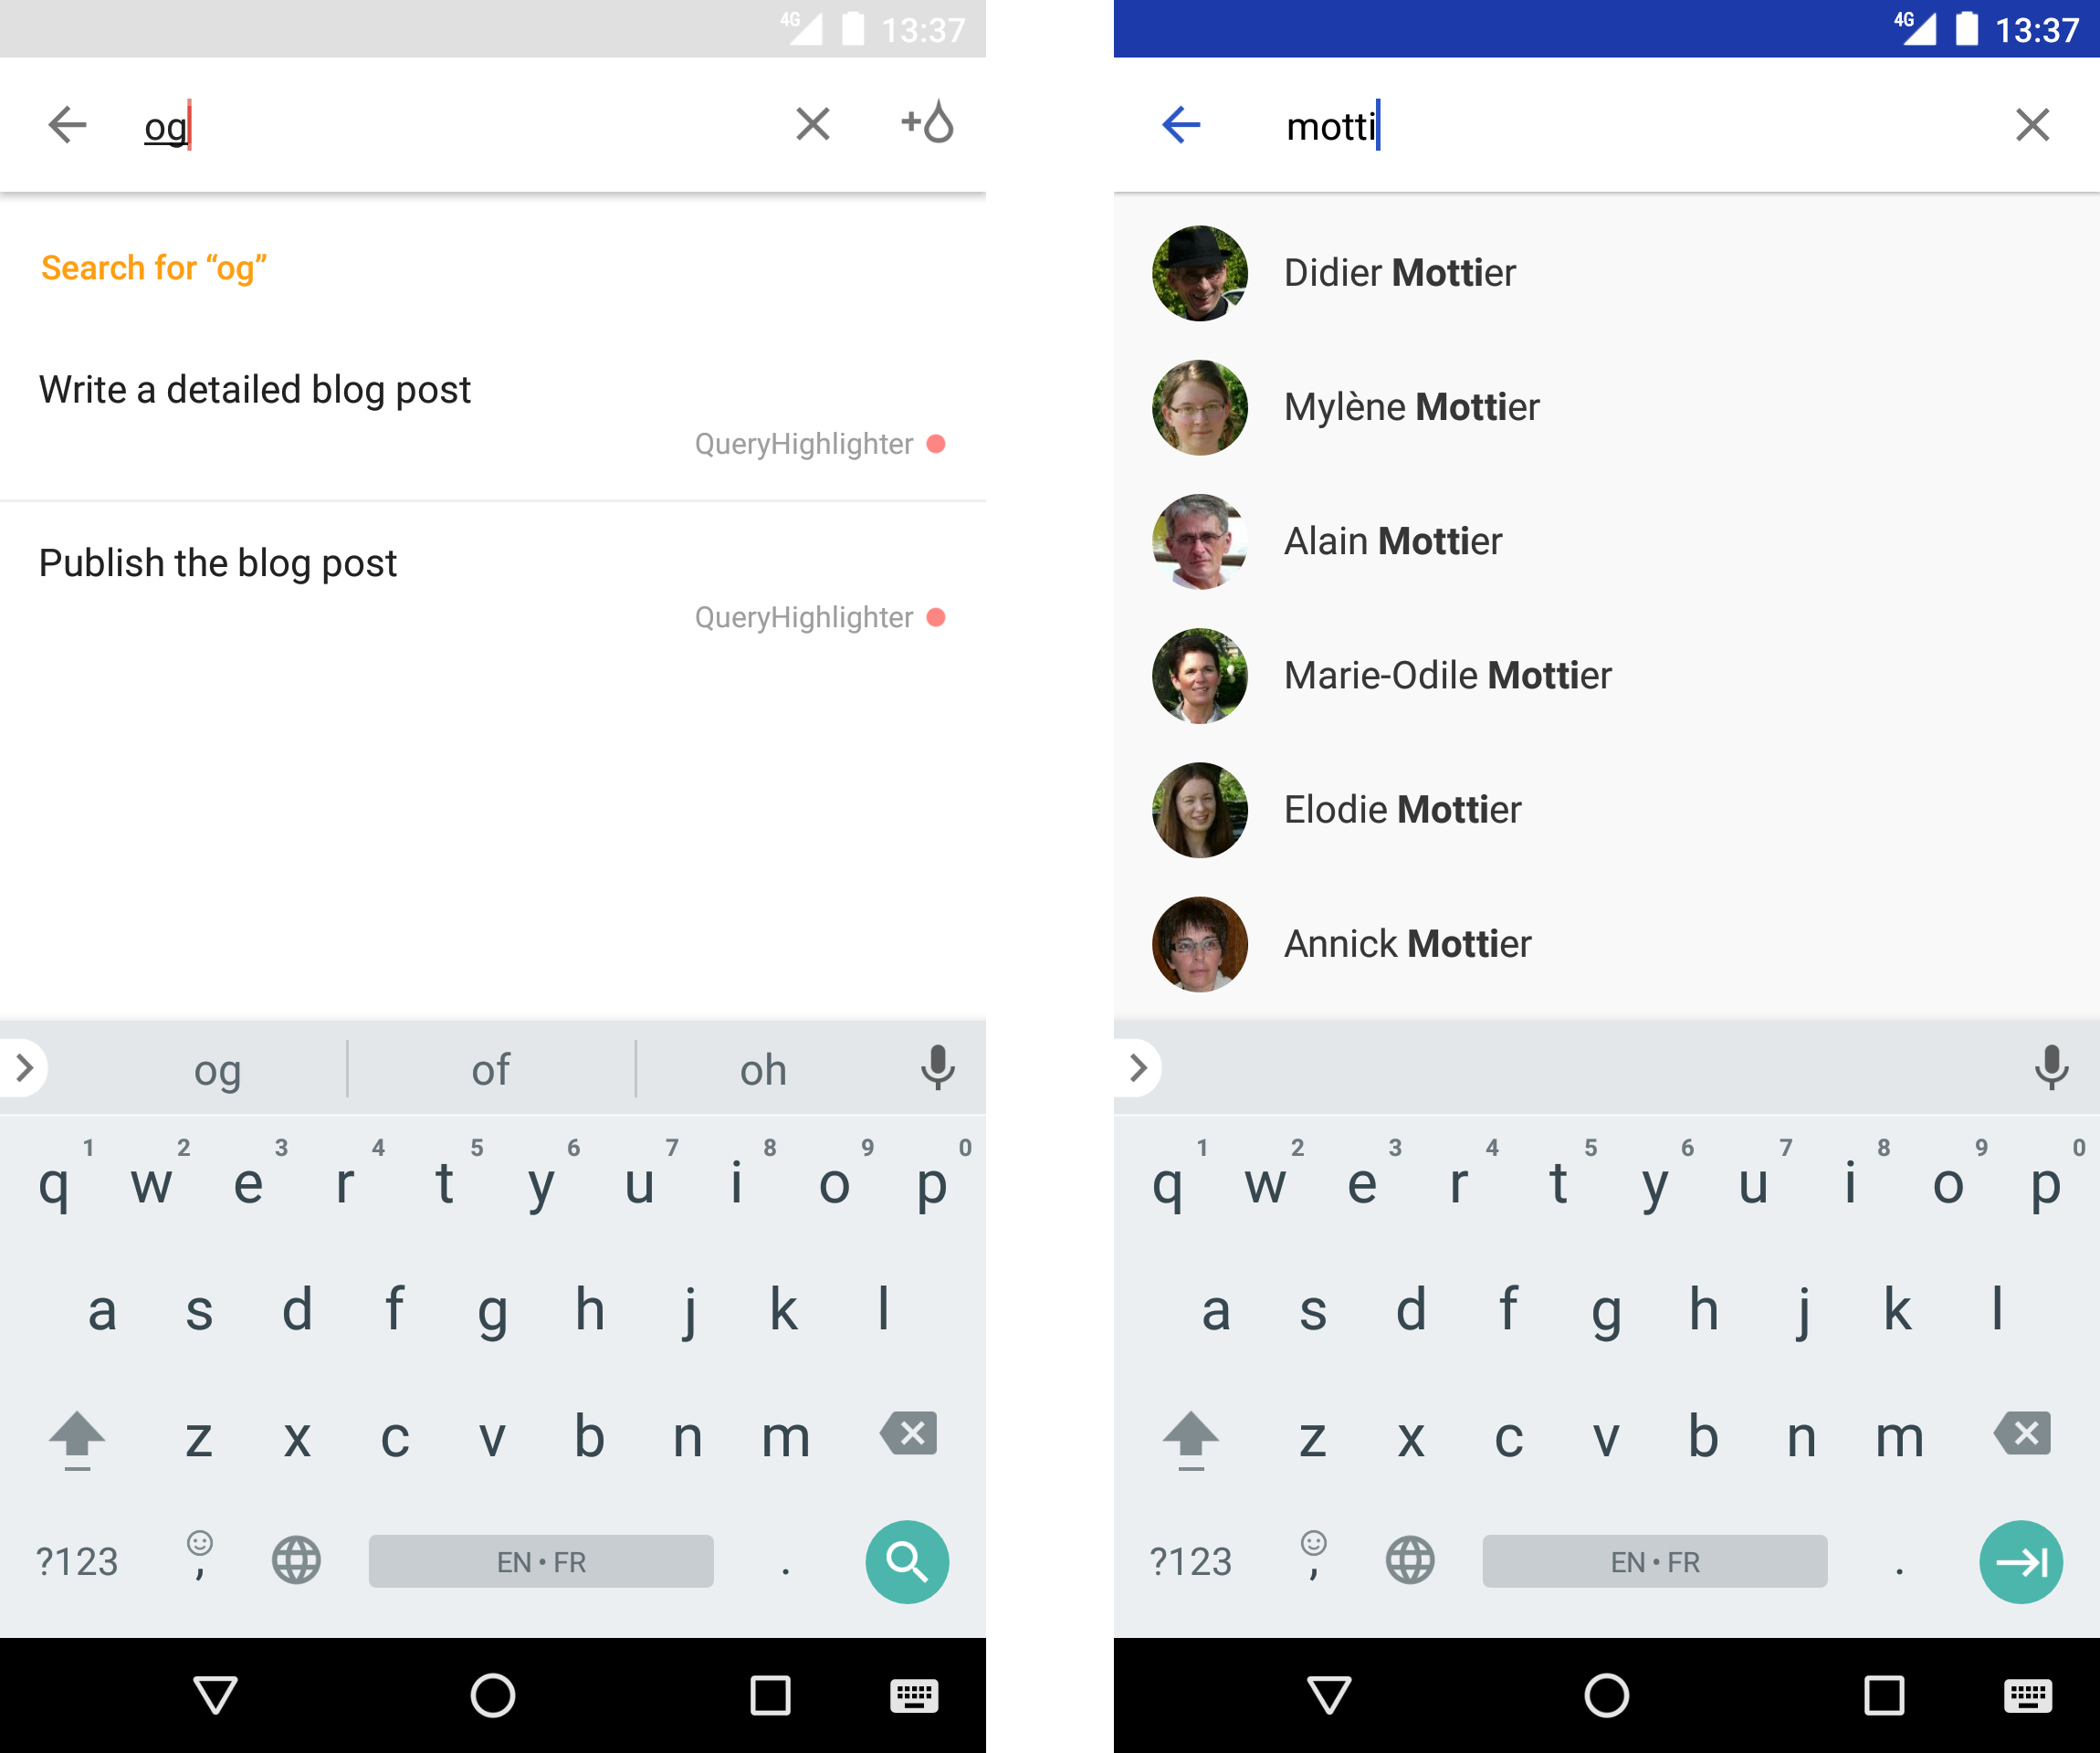
If you are familiar with designing mobile apps search experiences, you probably noticed the main difference between the two screenshots: search results highlights. Indeed, Todoist displays items with no styling at all while Contacts uses bold to better indicate the position of the matching search terms. This difference might seem visually minimal but highlighting search terms is actually a simple and efficient way to enhance user experience in search screens.
A UX overview
Highlights betterment
Search terms highlights are largely important in search experiences as they provide a lot of additional information to users:
- They clearly indicate why a result is shown. Although users trust the app and thus the filtering/searching feature, they always try to understand why an item is considered as a result. Highlighting matching search terms is an easy and clean way to draw the relationship between some content and the search query.
- They give users an hint on how the filtering is performed. In other words, highlights can educate the user about the way an app filters its content. Understanding the filtering algorithm can be useful especially when using it regularly. For instance, in the example above, Todoist provides “character-based” results: the query “og” gives results containing “bl[og]”. Thus, the next time the user starts a search, she knows she can type characters appearing inside words. On the other end - it’s not actually completely visible in the screenshot but you can test on your own device - Contacts works at the word level: “motti” matches “[Motti]er” but “otti” doesn’t as it’s not at the beginning of a word.
Atomic search components
As explained previously, highlighting search results helps users better understand search and filters in your app. But it doesn’t help improving the filtering algorithm itself. It’s up to your app to provide an accurate filtering. A search result is considered accurate from a user standpoint when it sends back to the query. As a consequence, most search implementation are based on a simple technique: they provide results containing 100% of the search query. Let’s consider the following list:
1 2 3 4 | |
What do you expect when searching for “no”? What about when typing “ta” as a query? Dependending on the search strategy you may end up with different results. When matching characters for instance, “no” matches both “camembert de [no]rmandie” and “me[no]nita” while you only get “camembert de [no]rmandie” when matching words. The word-based strategy even gives no results for “ta”. In real life, word-based strategies are to be favored. The strategy is obviously up to the context in which your app is used. However, in general, a word-based (i.e. beginning of words) strategy is the best option as it matches the user mental model. Indeed, when searching for a term, users tend to use “words” as the atomic text component. For example, I really don’t expect “Cyril” to be shown when I type “ri” in a search input.
Character normalization
Another important aspect of search is the ability to provide search results that are not matching exactly the search terms. This behavior is generally called fault tolerance. For instance, one might expect “San Francisco” to be displayed when typing “San Franscisco” (notice the extra ’s') as a query. In theory, implementing a great fault tolerance behavior involves integrating distance-based computations such as Jaro-Winkler or Levenshtein distances. In practice, using such distances is not easy and might end up displaying non accurate results.
However, there are some simple solutions you can use to avoid user frustration while still preserving accurate results: character normalization. The first simple normalization you can ensure is have a case-insensitive matching. For instance, when querying “SaN FranCiscO”, you expect “San Francisco” as a result.
Another tricker character normalization is dealing with accented characters. This is not always obvious for English-speaking people but accents are all around in lots of languages. The idea is to make non-accented queries matches accented data. For instance, querying “ceci” should match “[Céci]le”. At the time of the writing, Todoist (version 11.2.4) is not handling accented characters making searches painful sometimes.
Obviously, notions detailed above mainly focus on text-based search results. Some applications offer search on photo or video which makes the highlighting more difficult. In all cases, the quicker the user guesses the relationship between a search term and the results, the better.
A possible implementation
Prior deep diving into the code, let’s first determine what we need to achieve in order to implement search terms highlighting. The code can be split into three distinct parts: styling portion of text, finding the portion of text to style and applying highlight to items in a list.
The screencast below shows the app we want to achieve. It will just display a list of cheeses and provide a text input in order to filter them based on a query.
Highlighting portion of a text
The first thing we need to do is to find a way to display a styled version of a text. TextView obviously offers attributes like android:textColor or android:textStyle but this applies to the entire character sequence rather than a sub-portion of it. Fortunately, Android offers, since day one, an interface representing a character sequence whose portions can be “tagged” with styles: Spanned. The android.text.style contains a set of classes representing some common text styles: weight, color, size, etc.
I suppose most mobile developers are already familiar with Spanneds1. In particular, this is the feature that is used internally to render basic HTML content in a TextView. The HTML content is parsed generating a Spanned object passed to the TextView. If you want to discover more about Spanned, CharacterStyle, etc., I encourage you to read the official documentation as well as Flavien Laurent’s explanation article. Although, it has been written a while ago, the API hasn’t changed much since then so everything still applies today.
The code below uses an indexOfQuery method (described later) in order to tag the first portion of text matching wordPrefix. Note that the method returns a CharSequence because this is the super-type of both String and Spanned. Put simply, the method returns a freshly created and tagged SpannableString if wordPrefix is found. If not, it returns the input text as it.
1 2 3 4 5 6 7 8 9 10 11 12 | |
Determining parts to highlight
In theory, determining parts to highlight should be done using the exact same technique used to perform the filtering. Indeed, doing so ensure consistent results and enforces a single computation point. Unfortunately, in practice, this is generally difficult or impossible to do.
Let’s take an example to better understand the gap between filtering and highlighting. Imagine an application performing the filtering by querying a remote server. This app would GET /items?query=<query> and most APIs would respond with a (potentially empty) list a items. In this example there is a clean difference between the entity doing the filtering (the server) and the entity doing the highlight (the mobile app). Another example would be an application querying a local database with a simple LIKE clause, getting a Cursor and displaying those results on screen. Even though the filtering and highlighting happen on the same entity, they both need to be considered independently. Indeed, the filtering is generally managed by the app’s backend while the highlighting is handled by the UI part.
The perfect solution would be to receive items with tagging information associated to it. For instance, in case of a query “franc”, we could imagine a response as follows:
1 2 3 4 5 6 7 8 9 10 11 12 13 14 | |
In practice, this makes the API cumbersome1 and more importantly, it only pushes the filtering versus determining portion to highlight back to the server. For instance, when querying the database with a LIKE clause, you don’t get the index of the first occurrence by default. Secondly, it forces the backend to compute the index of the search term for all results which may not be necessary in long lists whose items are not displayed (do not forget items are lazily displayed in most mobile list-based scrolling containers).
In a nutshell, a great highlighting mechanism should match the behavior of the filtering and remain completely distinct from the filtering. This is not so simple. Fortunately, highlighting is not as important as filtering. As explained previously, it enhances user experience but it doesn’t need to work 100% of the time or be completely exact. If it works 99% of the time and does nothing for the remaining 1% it is still a huge enhancement to your search results.
The second part of the implementation consists on determining the portion of text that need to be highlighted. In other words, we need to find a way to determine the index of the character at which the highlight needs to start as well as its length. A simple solution is to use String.indexOf(String). In practice, you may want to tweak the behavior a little bit: use a word-based strategy, accept CharSequence, etc. Implementing your own method is generally the best option:
1 2 3 4 5 6 7 8 9 10 11 12 13 14 15 16 17 18 19 20 21 22 23 24 25 26 27 28 29 30 31 32 33 34 35 36 37 | |
Applying highlight to TextViews
Because highlighting text is a feature that can be reused, a good option is obviously to extract this behavior in a dedicated class. In order to do this, we can create a QueryHighlighter class that contains the methods and fields given above. QueryHighlighter#apply returns the CharSequence to set to the TextView. To make the QueryHighlighter usage even simpler on TextView, we can add a utility method setText:
1 2 3 | |
Using QueryHighlighter in an Adapter for instance, is now dead simple:
1 2 3 4 5 6 7 8 9 10 11 12 13 14 15 16 17 18 | |
Miscellaneous
I’ve published the code of this sample application on my own GitHub. You can browse it to get a better overview. Note that there are some differences between the code shown here and the code available on GitHub. Here are some extra notes:
QueryHighlighterhas several settable fields. Changing them afterwards (in a thread-safe manner of course) is not a problem either. As a result, I favored exposing setters over exposing several constructors. BecauseQueryHighlighteris generally instantiated once and never modified I also implemented a fluent API on setters. All setters return the same instance so that calls can be chained:
1 2 3 4 | |
QueryHighlighteronly highlights the first occurrence of the query. This is done on purpose because I consider highlighting all matching terms would be information overhead and displaying only the first occurrence is a sufficient condition. If you want to highlight all occurrences, you obviously can. Please note that doing so would require you to create a new interface acting as a highlight style provider and reusing these styles. Indeed, we can’t reuse the unique style set toQueryHighlighterbecause Android doesn’t support attaching the sameSpanmore than once to the sameSpanned.
Conclusion
Highlighting terms in search results on mobile requires only a few lines of code. Not implementing this feature would be a shame when knowing how much it enhances user experience. Do not miss a feature with such a great work-value ratio.
- 1: I have seen APIs returning items tagged directly with HTML. From an expressiveness standpoint, it is very similar. Unfortunately, it forces front-ends to start an HTML parser for each items. Yes … I’m not a huge fan of using HTML on mobile^^.